This article first appeared in the Autumn 2012 issue of Energy Futures, the magazine of the MIT Energy Initiative. Subscribe today.
High stresses combined with a corrosive environment can cause critical components inside power plants and other systems to crack and fail, sometimes with little warning. MIT researchers now have new insights into how such "stress corrosion cracking" may be affected by nanoscale disruptions in the crystalline structure of metallic materials. Using novel experimental methods, they showed that mismatches between adjacent crystals can create regions with altered mechanical properties, including hardness. In addition, those defects can change the electronic properties of the surface in the region, making reaction with oxygen more likely and accelerating the pace of corrosion. Ultimately, the MIT researchers hope to define nanostructures that can help prevent this pervasive, insidious form of material degradation and failure.
Nuclear power plants are designed for decades of operation. But finding materials that age well in the extreme environment inside an operating plant is difficult. A major problem is stress corrosion cracking, which combines chemical attack in the form of corrosion with stress from mechanical loads. "Corrosion causes a material to age in a particular manner and speed, and stress causes it to fracture after a certain period of time," says Bilge Yildiz, associate professor of nuclear science and engineering. "But when you have those two processes together, they interact, and both processes are accelerated." Worse still, the damage often is not obvious, so failure can be both unexpected and catastrophic. Stress corrosion cracking has been blamed for failing power plants, exploding natural gas pipelines, collapsing bridges, crashing airplanes, and more.
One challenge is that local structures in a material can make it more vulnerable to both fracture and chemical attack. Many of the most advanced materials for power plant components are polycrystalline, that is, made up of many tiny crystals, or "grains." The atoms inside each grain are lined up in a regular pattern. But neighboring grains within a solid may be oriented in different directions, so rows of atoms can be misaligned where two or more grains meet. According to one hypothesis, misalignments at those grain-to-grain interfaces—the "grain boundaries"—can affect the material's local response to stress and can create dislocations in the crystalline structure nearby that are more chemically reactive with oxygen and are thus more likely to corrode.
Yildiz, head of MIT's Laboratory for Electrochemical Interfaces, notes that carefully controlled processing conditions can produce materials with grains of pre-defined sizes and orientations. "So if we had a better understanding of the relationship between grain-boundary structure, response to mechanical stress, and resistance to corrosion, we might be able to create a surface structure or texture that would help inhibit stress corrosion cracking," she says.
But even after decades of corrosion research, there is still no conclusive picture of the processes going on at the grain boundaries. Part of the problem is that the effect is extremely local. "A grain boundary extends over only one or a few nanometers, so it's a confined medium," says Yildiz. "And it's a coupled chemical-mechanical degradation mode. So we needed new, high-resolution tools to reach the mechanical as well as chemical properties of these localized structures."
Looking for weakness
Yildiz's first task was to determine whether — and how — well-defined grain boundaries affect the mechanical properties of a material. She used a technique called nanoindentation, which involves pushing a hard tip into a solid sample while carefully controlling and monitoring the downward pressure of the tip. The relationship between the applied load and the volume of deformed material beneath the indenter serves as a measure of the material's hardness.
To perform the experiments, Yildiz and graduate student F. William Herbert of materials science and engineering worked with Krystyn Van Vliet, the Paul M. Cook Career Development Associate Professor of Materials Science and Engineering, director of MIT's Laboratory for Chemomechanics, and an expert in nanoindentation.
As their test material, they used Inconel 690, a nickel-based, corrosion-resistant superalloy especially suited for nuclear applications. They fabricated a sample with a variety of grain orientations and then made 200 nm-deep nanoindentations, spaced 2 microns apart and running in diagonal lines across the grain boundaries. These nanoindentations measured increasing force (or load) while monitoring the changing displacement as the diamond probe pressed into the metal surface.
One measure of interest is the "pop-in" load. In general, the gradually increasing force of the probe will elicit uniformly increasing penetration into the metal surface, with growing displacement of material. But at certain loads there are sudden bursts in displacement called pop-ins. The team defined the pop-in load as the first load that caused a displacement of more than 5 nm.
 Pop-in loads on the surface of a nickel-based superalloy sample
The figure above shows pop-in loads for indentations made more than 5 microns from any grain boundary (left bar)—so that deformation occurred "far" from a boundary, within a single grain—and those made within 1 micron of two types of grain boundaries. In a high-angle boundary (center bar), rows of atoms in the adjacent grains are oriented at a high relative angle. In a twin boundary (right bar), the atoms in the two grains are aligned at an angle that minimizes the interfacial energy at the boundary.
The series of tests shows that pop-in loads are significantly lower near both types of grain boundaries than away from the boundaries. In addition, the pop-in load is lower near the twin boundary than near the high-angle boundary, suggesting that the specific structure of the boundary may have an impact on how much resistance a given grain boundary has to permanent deformation.
Thus far, the researchers cannot conclude unequivocally that the observed difference in pop-in load is related only to the grain-boundary structures. More work is needed to understand other factors that may affect the outcome, for example, possible differences in the local chemical makeup or in the direction of the indenter during the test. Their novel tests to date do, however, confirm that resistance to stress is lower near grain boundaries than within grains, an outcome with implications for local vulnerability to stress corrosion cracking.
Creating defects, testing corrosion susceptibility
The next question is: Do dislocations associated with grain boundaries increase chemical reactivity, accelerating corrosion susceptibility even without changes in chemical composition? To find out, the researchers created their own well-defined dislocations on a pure surface and then tested for differences in chemical reactivity with oxygen near and away from the damaged regions.
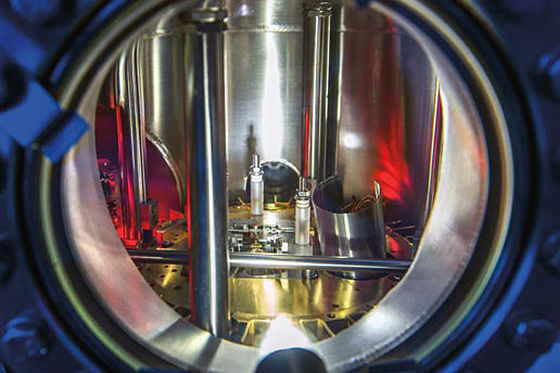 The view inside the customized scanning tunneling microscope that the researchers are using. With this device, they create carefully controlled indentations on a surface and then determine atom-by-atom changes in the physical structure as well as local alterations in chemical reactivity that result.
A scanning tunneling microscope (STM) can map the atom-by-atom topography across a surface and also determine the electronic structure, that is, the energy levels of electrons at a single location — a good indicator of how chemically reactive or passive a material is. So a single instrument can determine both the physical structure and the chemical reactivity on a surface within an extremely localized region.
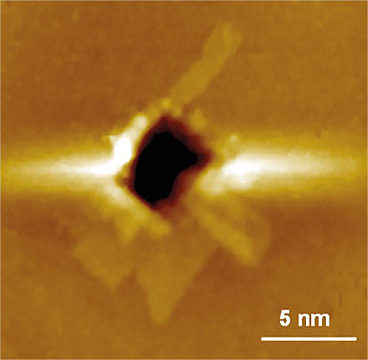
Micrograph that shows surface damage.
By adapting an STM in Yildiz's lab, the team added one more capability: the ability to create well-defined dislocations by indenting the surface with the STM tip. In normal operation, the tip of the STM must continually hover very close to the surface but never touch it. "Usually if you crash the tip into the sample, you do it by mistake," says Yildiz. "But with our customized STM tip, we can do it in a controlled manner, and it works as a very local, shallow indenter."
To begin the experiments, the researchers fabricated a single grain of pure nickel and polished it until it had an absolutely smooth, pristine surface. Using their customized STM, they then made indentations of varying depths between 0.5 and 20 nm. With the same instrument, they took images of the surface topography (see example below) and probed the energy levels of the electrons in the material both near and away from the damaged zones created by the indentations.
Their measurements showed that it is easier to transfer electrons from the surface to oxygen in the region of the dislocations than it is in the damage-free, flat regions. "So from an electronic structure perspective, the dislocations are likely to provide preferential nucleation sites for oxidative chemical reactions," says Yildiz. That finding supports the hypothesis that surfaces with dislocations will experience enhanced oxygen adsorption and subsequent formation of nickel oxide—the first steps in corrosion.
Visual evidence
The next step was to look for physical signs of corrosion. The researchers exposed their nickel surface to ultra-pure oxygen and then used the STM to take atomic-level images of various regions of the surface.
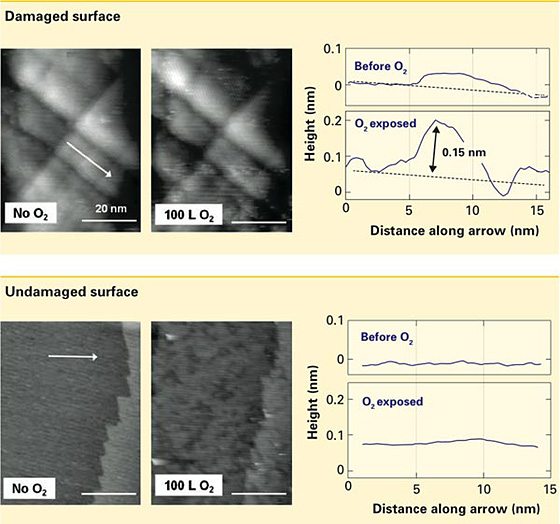
Damaged and undamaged nickel surfaces, before and after exposure to oxygen
Sample results are shown above. The top two images show the surface near the indentation, first in ultra-high vacuum (left) and then after exposure to oxygen (right). The left image shows smooth contours—the result of dislocations created by the indentation. In the right image, an added protrusion is evident. The bottom pair of images shows the undamaged surface. No noticeable bumps are present either before (left) or after (right) oxygen exposure.
The curves at the right show the height of the surface measured along the white arrows in the images at the far left. In the bottom figure—the pristine surface—there is essentially no change in level, either before (top curve) or after (bottom curve) oxygen exposure. In the top figure, the oxygen-free surface shows a small swelling indicating surface damage. When oxygen is present, the trace of the sample surface shows an added protrusion about 0.15 nm tall.
Work by other researchers has shown that nickel oxide initially forms in protrusions that are 0.15–0.2 nm tall. The new MIT images showed protrusions of precisely that height, consistent with early-stage nickel oxide formation. "And the protrusions formed preferentially on and along dislocations," says Yildiz. "So while theory has suggested that dislocations should be sites of faster corrosion, our images provide direct proof of it."
Computational studies
While continuing their experimental work, Yildiz and her colleagues are also developing new computational tools that can shed additional light on the corrosion process as well as on radiation damage. That work is part of the Consortium for Advanced Simulation of Light Water Reactors (CASL), a multi-institution Innovation Hub led by the Oak Ridge National Laboratory and funded by the US Department of Energy.
Yildiz's work focuses on zirconium alloys used as nuclear fuel cladding, an outer tube that surrounds the ceramic fuel pellets inside today's reactors. Since thinning of the cladding raises safety concerns, power plant operators use computer models to predict how fast damage from corrosion will progress.
In those models, certain critical parameters are based on experimental results and empirical observations. But Yildiz believes that many of them could instead be obtained through calculations based on first principles, that is, on fundamental laws of physics. Accordingly, she and her team have developed a new computational approach that can model corrosion-related deformation at the atomic scale over far longer time scales than achievable with traditional atomic-level methods—times compatible with the slowly progressing corrosion process.
According to Yildiz, models incorporating these new computational methods should help operators more accurately predict the impact of corrosion and radiation damage on the aging and performance of the fuel used in today's power plants. And for the longer term, her team's novel experimental techniques may yield materials with surface textures and nanostructures tailored to resist the mechanical stresses and corrosive environments that prevail in power plants, pipelines, and other critical components of today's infrastructure.
The experimental research was supported by the Nuclear Regulatory Commission Young Faculty Grant Program and by BP's Inherently Reliable Facilities Program. Early work was funded by an ignition grant from the MIT Energy Initiative. The computational research on corrosion of nuclear materials is being supported by CASL. Experimental and computational research on corrosion of oil and gas exploration field materials is being supported by the BP-MIT Advanced Materials and Corrosion Program.
High stresses combined with a corrosive environment can cause critical components inside power plants and other systems to crack and fail, sometimes with little warning. MIT researchers now have new insights into how such "stress corrosion cracking" may be affected by nanoscale disruptions in the crystalline structure of metallic materials. Using novel experimental methods, they showed that mismatches between adjacent crystals can create regions with altered mechanical properties, including hardness. In addition, those defects can change the electronic properties of the surface in the region, making reaction with oxygen more likely and accelerating the pace of corrosion. Ultimately, the MIT researchers hope to define nanostructures that can help prevent this pervasive, insidious form of material degradation and failure.
Nuclear power plants are designed for decades of operation. But finding materials that age well in the extreme environment inside an operating plant is difficult. A major problem is stress corrosion cracking, which combines chemical attack in the form of corrosion with stress from mechanical loads. "Corrosion causes a material to age in a particular manner and speed, and stress causes it to fracture after a certain period of time," says Bilge Yildiz, associate professor of nuclear science and engineering. "But when you have those two processes together, they interact, and both processes are accelerated." Worse still, the damage often is not obvious, so failure can be both unexpected and catastrophic. Stress corrosion cracking has been blamed for failing power plants, exploding natural gas pipelines, collapsing bridges, crashing airplanes, and more.
One challenge is that local structures in a material can make it more vulnerable to both fracture and chemical attack. Many of the most advanced materials for power plant components are polycrystalline, that is, made up of many tiny crystals, or "grains." The atoms inside each grain are lined up in a regular pattern. But neighboring grains within a solid may be oriented in different directions, so rows of atoms can be misaligned where two or more grains meet. According to one hypothesis, misalignments at those grain-to-grain interfaces—the "grain boundaries"—can affect the material's local response to stress and can create dislocations in the crystalline structure nearby that are more chemically reactive with oxygen and are thus more likely to corrode.
Yildiz, head of MIT's Laboratory for Electrochemical Interfaces, notes that carefully controlled processing conditions can produce materials with grains of pre-defined sizes and orientations. "So if we had a better understanding of the relationship between grain-boundary structure, response to mechanical stress, and resistance to corrosion, we might be able to create a surface structure or texture that would help inhibit stress corrosion cracking," she says.
But even after decades of corrosion research, there is still no conclusive picture of the processes going on at the grain boundaries. Part of the problem is that the effect is extremely local. "A grain boundary extends over only one or a few nanometers, so it's a confined medium," says Yildiz. "And it's a coupled chemical-mechanical degradation mode. So we needed new, high-resolution tools to reach the mechanical as well as chemical properties of these localized structures."
Looking for weakness
Yildiz's first task was to determine whether — and how — well-defined grain boundaries affect the mechanical properties of a material. She used a technique called nanoindentation, which involves pushing a hard tip into a solid sample while carefully controlling and monitoring the downward pressure of the tip. The relationship between the applied load and the volume of deformed material beneath the indenter serves as a measure of the material's hardness.
To perform the experiments, Yildiz and graduate student F. William Herbert of materials science and engineering worked with Krystyn Van Vliet, the Paul M. Cook Career Development Associate Professor of Materials Science and Engineering, director of MIT's Laboratory for Chemomechanics, and an expert in nanoindentation.
As their test material, they used Inconel 690, a nickel-based, corrosion-resistant superalloy especially suited for nuclear applications. They fabricated a sample with a variety of grain orientations and then made 200 nm-deep nanoindentations, spaced 2 microns apart and running in diagonal lines across the grain boundaries. These nanoindentations measured increasing force (or load) while monitoring the changing displacement as the diamond probe pressed into the metal surface.
One measure of interest is the "pop-in" load. In general, the gradually increasing force of the probe will elicit uniformly increasing penetration into the metal surface, with growing displacement of material. But at certain loads there are sudden bursts in displacement called pop-ins. The team defined the pop-in load as the first load that caused a displacement of more than 5 nm.
 Pop-in loads on the surface of a nickel-based superalloy sample
The series of tests shows that pop-in loads are significantly lower near both types of grain boundaries than away from the boundaries. In addition, the pop-in load is lower near the twin boundary than near the high-angle boundary, suggesting that the specific structure of the boundary may have an impact on how much resistance a given grain boundary has to permanent deformation.
Thus far, the researchers cannot conclude unequivocally that the observed difference in pop-in load is related only to the grain-boundary structures. More work is needed to understand other factors that may affect the outcome, for example, possible differences in the local chemical makeup or in the direction of the indenter during the test. Their novel tests to date do, however, confirm that resistance to stress is lower near grain boundaries than within grains, an outcome with implications for local vulnerability to stress corrosion cracking.
Creating defects, testing corrosion susceptibility
The next question is: Do dislocations associated with grain boundaries increase chemical reactivity, accelerating corrosion susceptibility even without changes in chemical composition? To find out, the researchers created their own well-defined dislocations on a pure surface and then tested for differences in chemical reactivity with oxygen near and away from the damaged regions.
 The view inside the customized scanning tunneling microscope that the researchers are using. With this device, they create carefully controlled indentations on a surface and then determine atom-by-atom changes in the physical structure as well as local alterations in chemical reactivity that result.
Micrograph that shows surface damage.
By adapting an STM in Yildiz's lab, the team added one more capability: the ability to create well-defined dislocations by indenting the surface with the STM tip. In normal operation, the tip of the STM must continually hover very close to the surface but never touch it. "Usually if you crash the tip into the sample, you do it by mistake," says Yildiz. "But with our customized STM tip, we can do it in a controlled manner, and it works as a very local, shallow indenter."
To begin the experiments, the researchers fabricated a single grain of pure nickel and polished it until it had an absolutely smooth, pristine surface. Using their customized STM, they then made indentations of varying depths between 0.5 and 20 nm. With the same instrument, they took images of the surface topography (see example below) and probed the energy levels of the electrons in the material both near and away from the damaged zones created by the indentations.
Their measurements showed that it is easier to transfer electrons from the surface to oxygen in the region of the dislocations than it is in the damage-free, flat regions. "So from an electronic structure perspective, the dislocations are likely to provide preferential nucleation sites for oxidative chemical reactions," says Yildiz. That finding supports the hypothesis that surfaces with dislocations will experience enhanced oxygen adsorption and subsequent formation of nickel oxide—the first steps in corrosion.
Visual evidence
The next step was to look for physical signs of corrosion. The researchers exposed their nickel surface to ultra-pure oxygen and then used the STM to take atomic-level images of various regions of the surface.

Damaged and undamaged nickel surfaces, before and after exposure to oxygen
Sample results are shown above. The top two images show the surface near the indentation, first in ultra-high vacuum (left) and then after exposure to oxygen (right). The left image shows smooth contours—the result of dislocations created by the indentation. In the right image, an added protrusion is evident. The bottom pair of images shows the undamaged surface. No noticeable bumps are present either before (left) or after (right) oxygen exposure.
The curves at the right show the height of the surface measured along the white arrows in the images at the far left. In the bottom figure—the pristine surface—there is essentially no change in level, either before (top curve) or after (bottom curve) oxygen exposure. In the top figure, the oxygen-free surface shows a small swelling indicating surface damage. When oxygen is present, the trace of the sample surface shows an added protrusion about 0.15 nm tall.
Work by other researchers has shown that nickel oxide initially forms in protrusions that are 0.15–0.2 nm tall. The new MIT images showed protrusions of precisely that height, consistent with early-stage nickel oxide formation. "And the protrusions formed preferentially on and along dislocations," says Yildiz. "So while theory has suggested that dislocations should be sites of faster corrosion, our images provide direct proof of it."
Computational studies
While continuing their experimental work, Yildiz and her colleagues are also developing new computational tools that can shed additional light on the corrosion process as well as on radiation damage. That work is part of the Consortium for Advanced Simulation of Light Water Reactors (CASL), a multi-institution Innovation Hub led by the Oak Ridge National Laboratory and funded by the US Department of Energy.
Yildiz's work focuses on zirconium alloys used as nuclear fuel cladding, an outer tube that surrounds the ceramic fuel pellets inside today's reactors. Since thinning of the cladding raises safety concerns, power plant operators use computer models to predict how fast damage from corrosion will progress.
In those models, certain critical parameters are based on experimental results and empirical observations. But Yildiz believes that many of them could instead be obtained through calculations based on first principles, that is, on fundamental laws of physics. Accordingly, she and her team have developed a new computational approach that can model corrosion-related deformation at the atomic scale over far longer time scales than achievable with traditional atomic-level methods—times compatible with the slowly progressing corrosion process.
According to Yildiz, models incorporating these new computational methods should help operators more accurately predict the impact of corrosion and radiation damage on the aging and performance of the fuel used in today's power plants. And for the longer term, her team's novel experimental techniques may yield materials with surface textures and nanostructures tailored to resist the mechanical stresses and corrosive environments that prevail in power plants, pipelines, and other critical components of today's infrastructure.
The experimental research was supported by the Nuclear Regulatory Commission Young Faculty Grant Program and by BP's Inherently Reliable Facilities Program. Early work was funded by an ignition grant from the MIT Energy Initiative. The computational research on corrosion of nuclear materials is being supported by CASL. Experimental and computational research on corrosion of oil and gas exploration field materials is being supported by the BP-MIT Advanced Materials and Corrosion Program.


